Extract Maven Dependency Version as Property

Problem: You got a lot of <version> tags in your Maven pom.xml that you want to centralize in <properties> section.

Solution: Use an editor with greedy RegEx functionality like Notepad++ 5.9+ to find and replace:

Find: (<dependency>\s+<groupId>)(.+)(</groupId>\s+<artifactId>)(.+)(</artifactId>\s+<version>)([^\$]+?)(</version>[\s\S]*?\s+</dependency>)
Replace: \1\2\3\4\5${\4.version}\7\n<\4.version>\6</\4.version>

This puts property in line under the dependency to be cut and pasted. The property is named after <artifactId> tag followed by .version, e. g. <example.version>. To clarify look at following example:

<dependency>
      <groupId>org.example.one</groupId>
      <artifactId>example1</artifactId>
      <version>1.2.3</version>
</dependency>

becomes

<dependency>
      <groupId>org.example.one</groupId>
      <artifactId>example1</artifactId>
      <version>${example1.version}</version>
</dependency>
<example1.version>1.2.3</example1.version>

Some more examples could be found here: RegEx101 example.

If you want to summon a little more magic use the following to directly paste <example.version> property into <properties> section.

Find: (<properties>)([\s\S]+?)(<dependency>\s+<groupId>)(.+)(</groupId>\s+<artifactId>)(.+)(</artifactId>\s+<version>)([^\$]+?)(</version>[\s\S]*?\s+</dependency>)
Replace: \1\n<\6.version>\8</\6.version>\2\3\4\5\6\7${\6.version}\9

Improvement: As you can see it’s not necessary to use that much capturing groups in RegEx pattern. You could of course join them, but this way it’s a little easier to customize resulting property.
Categories: Stuff

Rescue Data via Recovery Mode in macOS

I recently had to help a friend of mine rescuing some data from her MacBook’s hard drive. macOS upgrade from Yosemite to Sierra failed and her last TimeMachine backup was a month ago – still better than mine a year ago…

Here’s what we’ve done to save her data from MacBook’s internal to an external hard drive via recovery mode.

  • Start macOS’ recovery mode by holding down ALT key while powering on
  • Select Recovery Mode and confirm with Enter
  • In Recovery Mode select Utilities > Terminal from menu bar on top
  • Basic Terminal commands
    • cd "/Volumes/MacBook HD/Users/username/" change to your user directory (replace username by your username of course)
    • ls -l list files in current directory (-l switch shows more details)
    • cp -rv "/Volumes/MacBook HD/Users/username/" "/Volumes/External/Backup" copy data from first directory to second one (-rv means recursive for directories and verbose for showing detailed information while copying)
  • Connecting external hard drive
    • Run cd /Volumes && ls -l
    • Plug in your external hard drive
    • Run cd /Volumes && ls -l again and find out which entry has just shown up, let’s say External. This one’s your external hard drive
  • Copying all files from internal to external hard drive
    • Execute cp -rv "/Volumes/MacBook HD/Users/username/" "/Volumes/External/Backup"
  • Copying just some files from internal to external hard drive
    • Use cd "/Volumes/MacBook HD/Users/username/" && ls -l to list files in your user directory
    • Execute cp -rv "/Volumes/MacBook HD/Users/username/somedirectory" "/Volumes/External/Backup/somedirectory" for each directory or file you want to copy
  • Once all your data is saved unplug external hard drive and restore last backup as usual

Improving HTTPS Website Security Level

HTTPS finally spreads around the web and is getting more and more the de facto standard for websites. A few months ago Mozilla released its tool Observatory for testing website security level. It rates in form of grades from A+ (best) to F (worst). Following you’d see how to reach an A+ on your website and how to implement it in WordPress.

Basics

First of all you’ll need – of course – an HTTPS encrypted website. If you don’t have it right now visit (for example) Let’s Encrypt project for details.

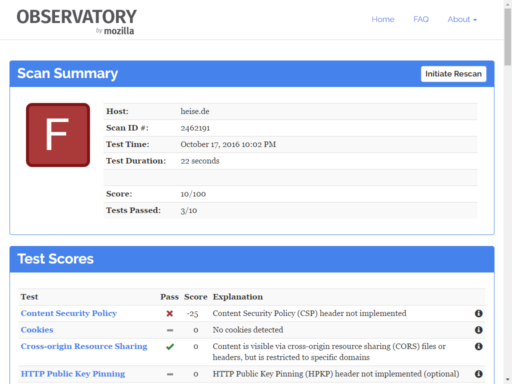
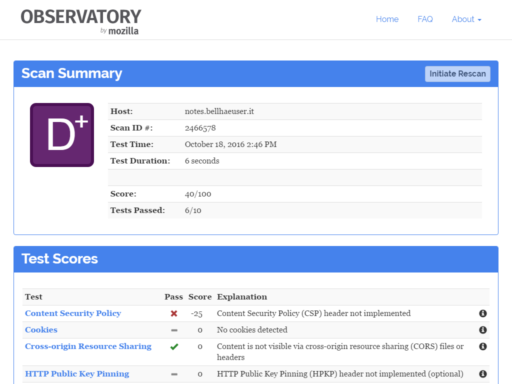
Now check your website by visiting Observatory’s homepage and pasting your URL. You’ll propably get a result like these:

You can improve website security level by implementing a couple of server headers. These can be set using different ways, for example via PHP as shown below.

Recommend security headers

To get an A+ from Observatory you have to set following headers (click on name for details):

  • Content-Security-Policy
    • Defines from what sources your content is allowed to be loaded. Default should be 'self' only allowing content from your own website. If you have to use content from other websites, e. g. Google Fonts or Gravatar, you should only load it from HTTPS encrypted sites. Additionally directive frame-ancestors controls framing of your website in modern browsers
    • Recommended value: default-src: 'self'; frame-ancestors: 'none'
    • Optional: Overwrite concrete -src definitions to enable functionalities, e. g. script-src: https: for loading scripts from external sites
    • No go: Usage of 'unsafe-inline' as Observatory will punish it (especially in script-src)
  • X-Frame-Options
    • Disables framing of your website in older browsers (see also Content-Security-Policy)
    • Recommended value: DENY
  • X-Content-Type-Options
    • Disables loading content without correct file type (only loads what pretends to be an image if it is actually an image)
    • Recommended value: nosniff
  • X-XSS-Protection
    • Prevents XSS attacks in older browsers
    • Recommended value: 1; mode=block
  • Strict-Transport-Security
    • Tells browsers to only load your website over HTTPS connection for given amount of time
    • Recommended value: max-age=15768000 (half a year)
    • Optional: Set a time frame longer than 15768000 seconds
    • No go: Set a time frame shorter than 15768000 seconds (half a year) or longer than 31536000 seconds (a year)
  • Permanent HTTP Redirection
    • Redirects all incoming HTTP requests to HTTPS. For example if you call http://example.com/somerequest it will redirect it automatically to https://example.com/somerequest preserving given request parameter (“somerequest”)
    • Set this directly in server config or use PHP code below

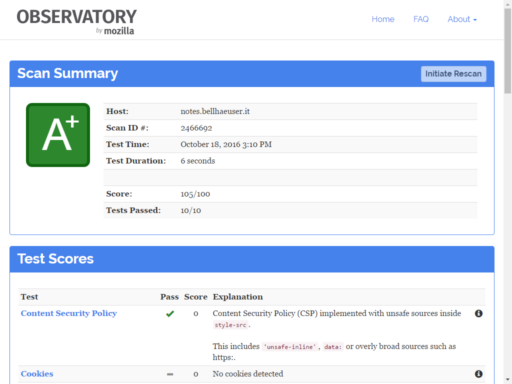
If you’ve set all headers you’ll get a ranking like following

Nota bene: As you can see I’m using style-src: 'unsafe-inline' because my template is requiring it. But it’s still A+ so I’m fine with that

Implementing security headers in WordPress

In admin panel go to Appearance > Editor and edit Main Index Template (index.php).

Insert after first <?php

// Permanent HTTPS Redirect
if (empty($_SERVER['HTTPS']) || $_SERVER['HTTPS'] == "off") {
  header('HTTP/1.1 301 Moved Permanently');
  header('Location: https://' . $_SERVER['HTTP_HOST'] . $_SERVER['REQUEST_URI']);
  die();
}

// Security Headers
// https://wiki.mozilla.org/Security/Guidelines/Web_Security
$cspHeader = array();
$cspHeader['default-src']       = "'self'";
$cspHeader['font-src']          = "data: https:";
$cspHeader['img-src']           = "https:";
$cspHeader['style-src']         = "https: 'unsafe-inline'";
$cspHeader['frame-ancestors']   = "'none'";
header("Content-Security-Policy: " . implode('; ', array_map(function ($key, $value) { return $key . ' ' . $value; }, array_keys($cspHeader), $cspHeader)));
header('X-Content-Type-Options: nosniff');
header('X-Frame-Options: DENY');
header('X-XSS-Protection: 1; mode=block');
header('Strict-Transport-Security: max-age=15768000');

Adding Anchor Tags to Subheadlines in WordPress

If you want to have clickable subheadlines with auto scroll function on your WordPress blog you could do following. There are some plugins doing the same and much more but I thought they are kinda oversized. The little piece of code below does the trick.

In admin panel go to Appearance > Editor > Theme Functions (functions.php). Insert anywhere:

function add_content_filter_headline_anchor($content) {
    if (is_single() && !is_null($content)) {
        $content = preg_replace_callback('~(<h[2-6].*)>(.*)(</h[2-6]>)~i', function ($matches) {
            $title = $matches[2];
            $slug = sanitize_title_with_dashes($title);
            return $matches[1] . ' id="' . $slug . '"><a href="#' . $slug . '">' . $title . '</a>' . $matches[3];
        }, $content);
    }
    return $content;
}
add_filter('the_content', 'add_content_filter_headline_anchor');

Go to Appearance > Customize > Custom CSS. Insert anywhere:

h2 a, h3 a, h4 a, h5 a, h6 a {
    text-decoration: none;
}

h2 a:hover, h3 a:hover, h4 a:hover, h5 a:hover, h6 a:hover {
    text-decoration: underline;
}

h2.post-title a {
    text-decoration: none;
}

Connect to Server via SSH with Git

Given: an Ubuntu server with central Git repository and connection via SSH and an Ubuntu client with local Git repository.

  • Deposit user’s SSH private key id_rsa in ~/.ssh (aka /home/user/.ssh)
  • chmod 0600 ~/.ssh/id_rsa to prevent other users reading user’s private key
  • If you also want to use Git with root user: cp /home/user/.ssh/id_rsa /root/.ssh/
  • Connect with git clone user@server:/path/to/git/<centralrepo>/ <localrepo>

Docker Cheat Sheet

Preamble

  • Data directory of my Docker services is /var/docker/. It’s also root directory for all following commands
  • I’m using service as a generic term for image and container
  • doco is an abbreviation for docker-compose (see installation guide below)
  • I’m using Git for versioning of Dockerfiles

Basic commands

Show status of containers

docker ps -a

Start services

doco up -d

Stop services

doco down

Remove container

docker rm <container:tag> [<container:tag> ...]

Show images

docker images

Remove image

docker rmi <image:tag> [<image:tag> ...]

Connect to shell in running container

docker exec -it <container> bash

Show Docker’s disk usage

du -hs /var/lib/docker/ /var/docker/

Versioning commands

Synchronize local and central repository

  • Fetch from central repository and merge automatically
    • git pull
  • Fetch and review changes before merging
    • git fetch and show differences with git log HEAD..origin
  • Push changes from local to central repository
    • git push

Show versioning status

git status

Add files to version control

  • Add files to index
    • git add .
  • Add files to repository
    • git commit -am "<message>"

Advanced commands

Backup and restore

For simple temporary backups you can use tar archives.

Create backup

  • Full backup
    • tar -czf backups/Full_$(date +%Y-%m-%d_%H-%M-%S).tar.gz docker-compose.yml services/
  • Partial backup (example)
    • tar -czf backups/<service>_$(date +%Y-%m-%d_%H-%M-%S).tar.gz services/<service>/data/

Restore backup

  • Complete restore
    • tar -xzf backups/Full_YYYY-MM-DD_HH-MM-SS.tar.gz
  • Partial restore of full backup (example)
    • tar -xzf backups/Full_YYYY-MM-DD_HH-MM-SS.tar.gz services/<service>/data/

Guides

Setting up Docker on Ubuntu


Creating a Blog Like This One

Interested in a fancy blog like this one? Just follow this guide and you’ll get an awesome lookalike! Okay, maybe it’s just a reminder for myself what I’ve got to do when I’ve finally broken my WordPress installation

Install WordPress

  • Download a fresh copy of WordPress from its download site
  • Upload and unpack it to a directory on your webserver
  • Let a subdomain point to that directory
  • Go to that subdomain and follow installation steps (creating database and stuff)

Install and activate plugins

Install features

Change settings

In admin panel go to Settings.

  • General
    • Adjust Tagline
    • Adjust Timezone
    • Set Date Format to F jS, Y
  • Writing
    • Remove Update Services
  • Discussion
    • Uncheck all Default article settings
  • Media
    • Set Thumbnail size to 256 x 256 px
    • Set Medium size to 512 x 512 px
  • Permalinks
    • Activate Month and name
  • PhotoSwipe
    • Set Thumbnail Width and Height to 256 px
    • Check Don’t use Masonry
  • External Links
    • Check Apply Globally, Apply to Text Widgets, Treat Subdomains as Local, Add Icons, Open in New Windows and Exclude HTML Code Blocks
    • Uncheck Auto Convert Text Urls and Add No Follow

Install and activate theme

Customize appearance

In admin panel go to Appearance > Customize.

  • Avatar
    • Upload an image > Upload logo (don’t use Logo option because other than Avatar it won’t resize)
  • Blog
    • Show full posts on blog > Yes
  • Comment display
    • Show comments on > Comments not displaying
  • Widgets > Primary Sidebar
    • Remove widgets except Search and Categories
    • Add text widget with title “About” and about text
  • Custom CSS
    • Set following

Custom CSS

.site-avatar {
    border-radius: 0;
}

.entry {
    margin-bottom: 3em;
}

@media (max-width: 34.375em) {
    .main {
        padding-top: 0em;
        margin-top: 1.5em;
    }
}

@media (min-width: 34.375em) {
    .main {
        padding-top: 3em;
    }
}

a.external_icon {
    -webkit-filter: grayscale(100%);
    filter: grayscale(100%);
}

Customize theme files

In admin panel go to Appearance > Editor > Author (preselected).

Edit Search Form (searchform.php)

Replace title="<?php esc_attr_e( 'Search for:', 'author' ); ?>" by placeholder="<?php esc_attr_e( 'Search', 'author' ); ?>"

Edit Theme Footer (footer.php)

Insert before echo wp_kses_post( $footer_text );

$footer_text = 'by <a href="https://www.bellhaeuser.it/" target="_blank">Niels Alexander Bellh&auml;user</a>';
if (is_single()) {
    $footer_text.= ' &middot; <a href="/wp-admin/post.php?post=' . get_the_ID() . '&action=edit" rel="nofollow">Edit</a>';
    }
$footer_text.= ' &middot; <a href="https://www.bellhaeuser.it/contact" target="_blank">Contact</a>';
$footer_text.= ' &middot; <a href="https://www.bellhaeuser.it/imprint" target="_blank">Imprint</a>';

Edit Theme Functions (functions.php)

Insert anywhere

function protected_shortcode($atts, $content = null) {
    if (is_user_logged_in() && !is_null($content) && !is_feed()) {
        return $content;
    }
    return preg_replace('/\S/', '*', $content);
}
add_shortcode('protected', 'protected_shortcode');

Customize plugin files

In admin panel go to Plugins > Editor > PhotoSwipe Masonry.

Edit photoswipe-masonry/photoswipe-masonry.php

Comment <button class="pswp__button pswp__button--share" title="Share"></button> out.


Installing netatalk on Ubuntu 14.04 LTS

Follow this instruction if you want to use an Ubuntu server as macOS TimeMachine backup volume.

Install netatalk

Following steps are essentials from this instruction.

Install dependencies via apt-get

# apt-get install build-essential libevent-dev libssl-dev libgcrypt-dev libkrb5-dev libpam0g-dev libwrap0-dev libdb-dev libtdb-dev libmysqlclient-dev avahi-daemon libavahi-client-dev libacl1-dev libldap2-dev libcrack2-dev systemtap-sdt-dev libdbus-1-dev libdbus-glib-1-dev libglib2.0-dev tracker libtracker-sparql-0.16-dev libtracker-miner-0.16-dev

Download latest version of netatalk

$ cd /tmp
$ wget http://downloads.sourceforge.net/project/netatalk/netatalk/3.1.8/netatalk-3.1.8.tar.bz2
$ tar xvf netatalk-3.1.8.tar.bz2
$ mv netatalk-3.1.8 /opt/netatalk
$ cd /opt/netatalk

Build netatalk

$ ./configure \
    --with-init-style=debian-sysv \
    --without-libevent \
    --without-tdb \
    --with-cracklib \
    --enable-krbV-uam \
    --with-pam-confdir=/etc/pam.d \
    --with-dbus-sysconf-dir=/etc/dbus-1/system.d \
    --with-tracker-pkgconfig-version=0.16
$ make
# make install

Configure netatalk

First create user “timemachine” then run:

$ nano /usr/local/etc/afp.conf
    [Global]
    hostname = FileServer

    [Time Machine]
    path = /var/data/Alex/Sicherung/MacAlex/TimeMachine
    spotlight = no
    time machine = yes
    valid users = timemachine
    vol size limit = 512000
# chown timemachine /var/data/Alex/Sicherung/MacAlex/TimeMachine
$ service netatalk start
# update-rc.d netatalk defaults

Connect to Time Machine on Mac

Just use default way to add a new backup volume to Time Machine. Connect with user “timemachine” and password “***********“.


Enable Root Access in WinSCP

To enable root access to some server do following steps on this server:

  • # nano /etc/ssh/sshd_config
  • Uncomment line permitRootLogin without-password and save file
  • # service ssh restart
  • Eventually set new password for root user: # passwd root